
One of the fun things about wet plate photography is that you can make an image on almost any suitable piece of metal. Old oil cans, solvent cans, coffee tins, advertising signs, and other discarded containers can all become tintype plates.
These are often called “hobo tintypes.” I don’t know that there is one universally agreed-upon definition, but the name is generally used for tintypes made on found, recycled, or unusually shaped pieces of metal rather than commercially prepared trophy aluminum.
The process isn’t complicated, but it does involve sharp metal, power tools, flammable residue, solvent-based coatings, and heat. Wear appropriate eye, hand, and respiratory protection, work in a well-ventilated area, and keep a suitable fire extinguisher nearby.
Choosing a Can
First, make sure the can is actually metal. Steel and aluminum are both common and work well. Some cans are metal but the print is on a plastic wrap. You can still use the metal from those, but the wrap will usually fall off.
You’ll also need enough usable surface area for the plate size you want. Common wet plate sizes include 4×5, 5×7, and 8×10 inches, although you can make plates in almost any size your equipment can accommodate. I’ve made plates as small as 24×36 mm to fit inside a 35 mm film camera.
Finding a can large enough for an 8×10 plate can be difficult, but 4×5 plates are possible with a wide variety of containers.
Before cutting, make sure the can is completely empty. I usually puncture the bottom and let it drain for a while. Even then, some automotive and chemical cans can retain flammable liquid or vapor.
I’ve had supposedly empty cans catch fire while cutting them. I generally work outside or on a concrete floor with a fire extinguisher nearby.
Cutting Open the Can
I made my first plates entirely with tin snips. That works and will give you perfectly usable plates. These days I use an angle grinder to open the cans and a guillotine-style paper cutter to trim the metal. That gives me straighter cuts and cleaner edges.
I begin by cutting off the top and bottom of the can. I try to cut directly along the rolled seams, or just inside them, to preserve as much usable metal as possible. With a cone-top can, I cut immediately below the point where the cone begins. Otherwise, the remaining metal won’t unroll properly.
I originally did all of this while holding the can and grinder by hand. It worked, but it never felt especially safe.
I eventually bought an inexpensive angle-grinder stand. It holds the grinder so that it can be used somewhat like a small chop saw. Mine cost less than $30, and it makes the work faster and more controlled.
The stand is far from perfect. It’s a little wobbly, the bolts tend to loosen, and I had to remove its clamping base to fit ordinary cans beneath the grinder. Clearance is limited, too. If the object is irregularly shaped or much larger than something like a WD-40 can, you may need a different setup.
Whatever method you use, securely support the container and keep your hands away from the cutting path. It’s usually not recommended to wear gloves around spinny, cutty things.
Once the top and bottom are removed, I cut vertically along the side of the can. If there’s an obvious seam, I usually follow it. If there isn’t, I choose a spot that avoids the most interesting part of the design. Most cans have a blank area, barcode, or block of fine print that I don’t mind sacrificing.
The result will be a curved sheet of thin metal. I flatten it by hand as much as I reasonably can. It doesn’t need to be perfect yet just flat enough to handle and trim safely.
Be careful at this stage. Freshly cut cans can be surprisingly sharp, and the grinder may leave burrs or jagged edges. I’ve sliced my hands more than once. Now is a good time for gloves.
Cutting the Plates to Size
I use a cheap Amazon Basics guillotine-style paper cutter. It works, but it feels cheap and became dull fairly quickly. To be fair, it was designed for paper, not sheet metal. A sturdier cutter or small bench shear would probably last longer and produce more consistent results.
I begin by trimming away the jagged edges and squaring up the sheet. Then I decide where the final plate, or plates, will be located.
If the can has an interesting logo or design, I’ll try to center that on the finished plate. If I’m only making plates to experiment with, I may ignore the composition and concentrate on getting as many usable pieces as possible.
Sometimes I can get one 4×5 plate and a smaller plate from the same can. The leftover piece might fit a Kodak box camera, a homemade plate holder, or something else. There is almost always some waste, but I try to use as much of the original metal as possible.
After making the final cuts, inspect the plate carefully. Remove sharp corners and burrs with a file. Rounded corners also make the plate easier to insert into and remove from a holder.
Preparing the Surface
Most modern cans have some kind of protective plastic or resin liner on the inside.
I’ve tried all sorts of ways to remove it: heat, chemicals, steel wool, and abrasive flap wheels. Usually, I just ended up damaging or distorting the thin metal. I haven’t noticed any problems from leaving the liner in place and applying the Japan directly over it.
I usually clean the metal with brake cleaner and then alcohol. I use 190-proof Everclear because it’s inexpensive, readily available where I live, and useful for other photographic processes.
After the first cleaning, I lightly scuff the surface with steel wool. I’m not trying to remove the liner or heavily scratch the plate, just giving the Japan a little texture to grip, and removing any surface rust. I then clean it with alcohol again to remove dust and residue.
At that point, the plate is ready for japanning.
My Current Japan Formulas
I’m still experimenting to find the formula and technique that work best for me. At the moment, I use two separate coatings.
First Coat
- 275 ml full-strength mineral spirits or paint thinner
- 50 g powdered asphaltum
- 1½ tablespoons bone black
- ⅛ cup spar urethane
I use ordinary full-strength mineral spirits. I’ve been told that low-odor mineral spirits won’t work properly for this formula, although I haven’t tested it myself.
Second Coat
- 275 ml mineral spirits
- 50 g powdered asphaltum
- ⅓ teaspoon Canada balsam
These are two separate mixtures. I prepare them separately and store each one in its own clearly labeled, solvent-compatible container.
The paint thinner I get from the local hardware store. If you have trouble finding it locally, check Klingspor’s Woodworking Shop (Paint Thinner, 100% Mineral Spirits, Gallon)
Asphaltum comes from Artcraft Chemicals (Asphaltum/Gilsonite, 1 lb #1001 – Artcraftchemicals)
Bone Black I found on Etsy from seller NorthernWestStuff2 (Bone Black Pigment – Etsy)
Spar urethane you should be able to get from your local hardware store. Amazon probably sells it too.
Canadian Balsam also comes from Artcraft (Canadian Balsam, Fir – Artcraftchemicals)
Mixing the Japan
This is the portion of the process that requires the most care. Mineral spirits produce flammable vapors, and heating them creates a serious fire risk.
Do not use an open flame, work outdoors or with appropriate explosion-safe ventilation, away from sparks and other ignition sources. I use an electric hot plate. It may not be completely safe, but it’s way better than an open flame.
The objective is to warm the mixture enough to dissolve and combine the ingredients.
I stir constantly with a glass rod until everything is fully incorporated and the mixture has thickened enough to pour smoothly without immediately running off the plate. The exact time depends on the temperature, batch size, and heating method. I usually boil it for around 14 minutes.
The most important part is making sure everything is completely dissolved and thoroughly mixed. Any grit or clumps can create bumps and defects in the finished coating.
After mixing, I let the Japan cool before transferring it into a labeled glass jar with a compatible lid.
Pouring the First Coat
Before pouring, I flatten the plate again as much as possible. A recycled can will rarely be perfectly flat, but flatter is better. It makes the Japan easier to pour and helps keep the final image plane consistent inside the plate holder.
I pour the Japan near the center of the plate and tilt it until the entire surface is covered. It’s similar to pouring collodion, but far less time-sensitive. It doesn’t matter much if the coating flows back over itself, and you can add more if the first pour doesn’t cover the entire surface.
Once the plate is coated, I drain the excess into a separate glass container. I don’t pour it directly back into my clean stock because it may have picked up dust, fibers, or other debris. Instead, I collect the used Japan separately and filter it before returning it to the corresponding pouring bottle.
Some Japan will usually run down the back of the plate. I wipe away the excess with a paper towel or disposable rag. The back may remain stained, but that doesn’t bother me. It adds to the greasy, well-used character of the finished plate.
Keep solvent-soaked paper towels and rags in an appropriate closed waste container. Don’t leave them piled near the oven or work area.
Drying and Baking
Stand the plate vertically so the excess coating can drain away. Some people build simple L-shaped drying racks from wood. I usually lean mine inside cardboard boxes.
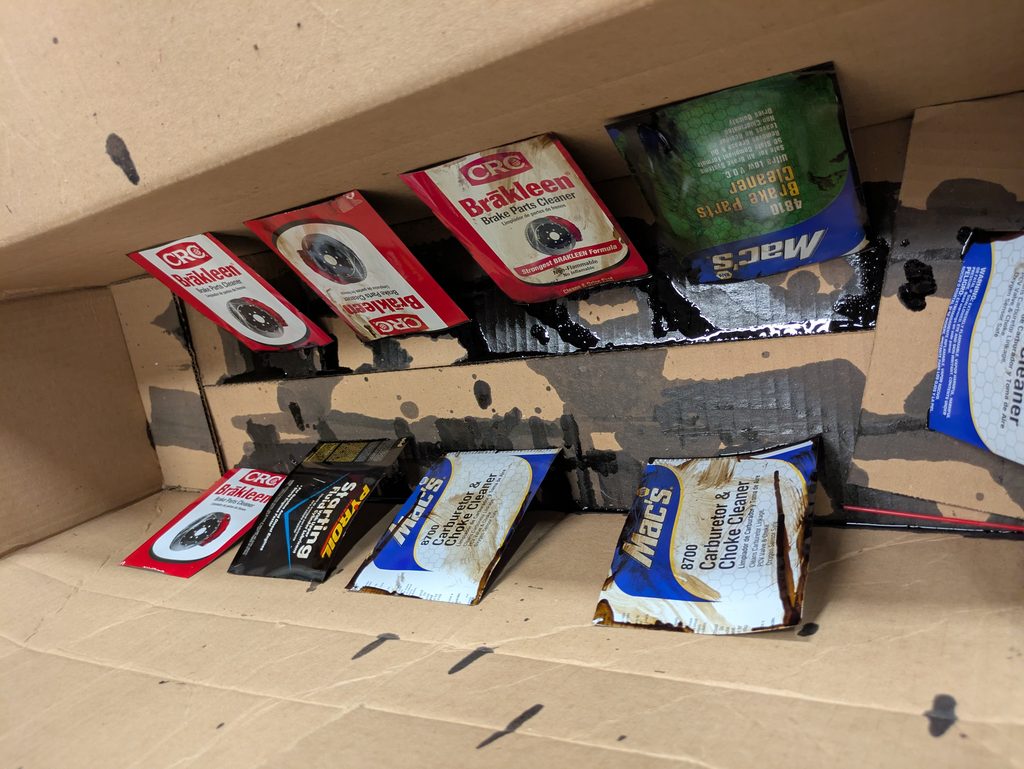
Position the plate with the coated side facing downward at an angle. This helps keep dust from settling on the wet surface.
I allow the plate to air-dry for approximately 30 minutes, or until the bulk of the solvent has flashed off.
Never place a freshly poured, solvent-heavy plate into a household oven or any oven with an exposed heating element. Solvent vapor can ignite, and a toaster oven is not explosion-proof. Any oven used for this work should be dedicated exclusively to the process, located in a well-ventilated nonliving workspace, and used only after the coating has adequately flashed off.
For my first coat, I bake the plate at approximately 250°F for about 10 minutes, then turn off the oven and allow the plate to cool inside it.
Equipment, coatings, and conditions vary, so test cautiously with scrap pieces rather than treating those numbers as universal.
Applying the Second Coat
Once the plate is completely cool, I repeat the pouring, draining, drying, and baking process using the second-coat formula. For the second-coat I heat it to 225°F for the same 10ish minutes and let it cool in the oven.
If the plate still isn’t dark or even enough, I may add another coat. For every additional coat, I continue using the second-coat formula.
The first formula is only used for the first coat.
Storing the Finished Plates
Once the final coat has baked and cooled, the plate is ready to use.
I designed and 3D-printed storage boxes that keep my plates separated. Plenty of people simply stack their finished plates with sheets of paper between them to prevent scratching.
A properly cured Japan surface is fairly tough, so the plates aren’t extraordinarily delicate. Still, keeping the faces separated will prevent scratches and preserve all that work until you’re ready to coat one with collodion and make a photograph.
That’s really the appeal of hobo tintypes: you’re taking an object that might otherwise be thrown away and giving it an entirely new purpose. The original label, scratches, stains, and signs of use become part of the finished photograph.